Quick Start Guide
Get FineFoundry running in about 5 minutes. No complicated setup required!
What You Need
- Python 3.10 or newer — Download here if you don't have it
- Windows, macOS, or Linux — All platforms supported
- Optional: NVIDIA GPU for training (8GB+ VRAM recommended)
The Easy Way (uv)
# Clone the repository
git clone https://github.com/SourceBox-LLC/FineFoundry.git FineFoundry-Core
cd FineFoundry-Core

# Install uv if needed
pip install uv

# Run the application (uv handles dependencies automatically)
# One-time (macOS/Linux): allow executing the launcher script
chmod +x run_finefoundry.sh
./run_finefoundry.sh

# Alternative (without the launcher script)
uv run src/main.py
The Traditional Way (pip)
# Clone and set up a virtual environment
git clone https://github.com/SourceBox-LLC/FineFoundry.git FineFoundry-Core
cd FineFoundry-Core
python -m venv venv

# Activate (macOS/Linux)
source venv/bin/activate

# Activate (Windows PowerShell)
./venv/Scripts/Activate.ps1

# Install and run
pip install -e .
python src/main.py
What You'll See
FineFoundry opens as a desktop app with tabs for each step of your workflow:
- Data Sources — Collect training data from websites or your own documents
- Publish — Organize and optionally share your datasets
- Training — Teach AI models using your data
- Inference — Chat with your trained models to test them
- Merge — Combine multiple datasets together
- Analysis — Check your data quality before training
- Settings — Set up accounts and preferences
Your First 5 Minutes
- Go to Data Sources tab
- Select a source (try Reddit or Stack Exchange)
- Click Start and wait for data to collect
- Click Preview to see what you got!
That's it! You've just collected your first training dataset.
Installation
Everything you need to get FineFoundry running on your machine.
What You Need
FineFoundry runs on Windows 10+, macOS 11+, and Linux (Ubuntu 20.04+). You'll need Python 3.10 or higher and at least 8GB RAM (16GB+ recommended for training). For local GPU training, you'll want an NVIDIA card with CUDA support.
Getting uv
We recommend uv for managing dependencies—it's faster than pip and handles everything automatically:
pip install uv
uv --version  # verify it works
Running FineFoundry
# Make sure Python 3.10+ is installed
python --version

# Run with uv (recommended)
uv run src/main.py.venv folder and run uv run src/main.py again. uv will recreate everything fresh.
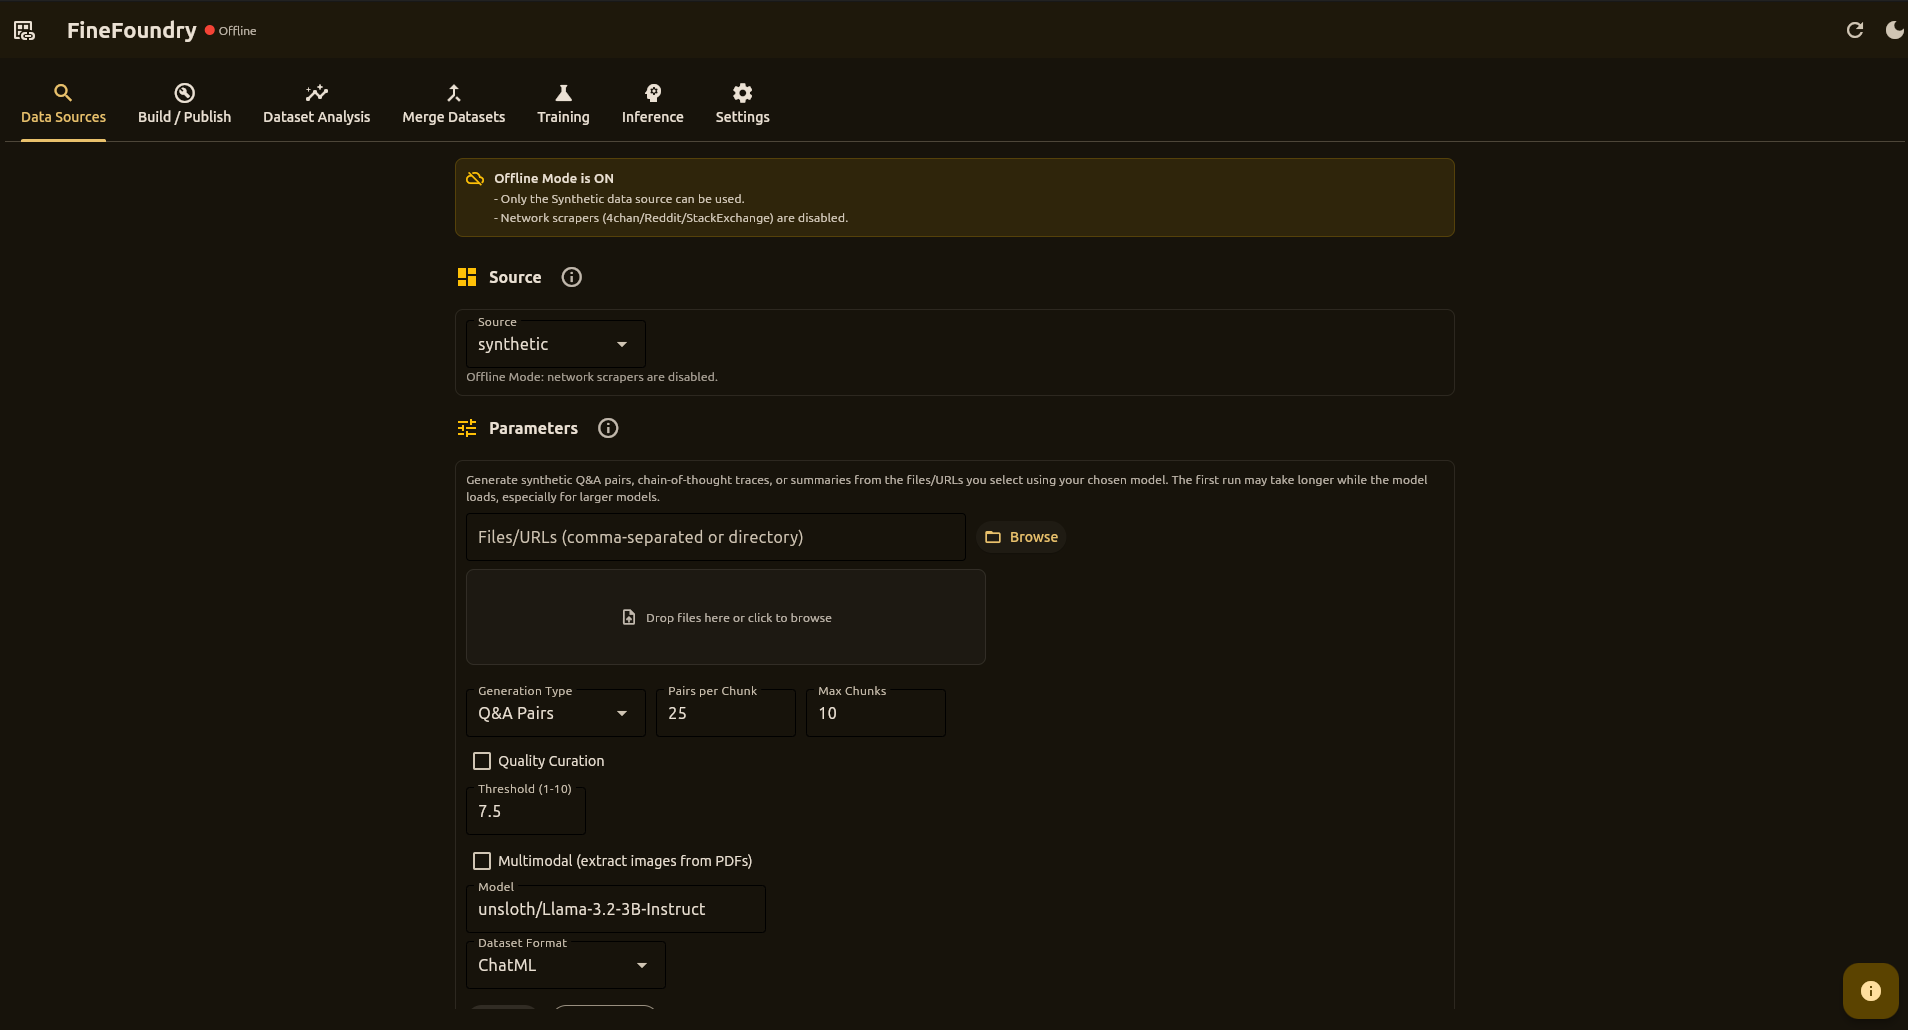
Data Sources Tab
This is where you collect data to train your AI. You can grab conversations from websites like Reddit and 4chan, or create training data from your own documents.
Where You Can Get Data
Collect conversations from boards. Good for casual, unfiltered dialogue.
Collect from subreddits or posts. Great for topic-specific data.
Q&A pairs from sites like Stack Overflow. Perfect for technical training.
Create training data from your own PDFs and documents.
Key Settings
- Max Threads/Posts — How many pages to collect from
- Max Pairs — Stop after collecting this many conversation pairs
- Delay — Pause between requests (be polite to websites!)
- Min Length — Skip very short pairs (filters out junk)
Tip: Start with small numbers (50 threads, 500 pairs) to test, then scale up.
Pairing Modes
Normal Mode
Creates pairs from adjacent posts. Simple and fast, but loses conversational context.
Contextual Mode
Builds context from the conversation thread:
- quote_chain – Follows reply chains via quote references
- cumulative – Accumulates all previous posts as context
- last_k – Uses the last K posts as context
Output Format
[
  {"input": "What do you think about...", "output": "I believe that..."},
  {"input": "Can you explain...", "output": "Sure, here's how..."}
]Synthetic Data Generation
Generate training data from your own documents using local LLMs powered by Unsloth's SyntheticDataKit.
Supported Input Formats
- PDF documents
- DOCX (Word documents)
- PPTX (PowerPoint)
- HTML/HTM web pages
- TXT plain text
- URLs (fetched and parsed)
Generation Types
- qa – Question-answer pairs from document content
- cot – Chain-of-thought reasoning examples
- summary – Document summaries
Synthetic Parameters
- Model – Local LLM to use (default:
unsloth/Llama-3.2-3B-Instruct) - Generation Type – qa, cot, or summary
- Num Pairs – Target examples per chunk
- Max Chunks – Maximum document chunks to process
- Curate – Enable quality filtering with threshold
Publish Tab
This is where you prepare your data for training and optionally share it on Hugging Face (a popular AI community site).
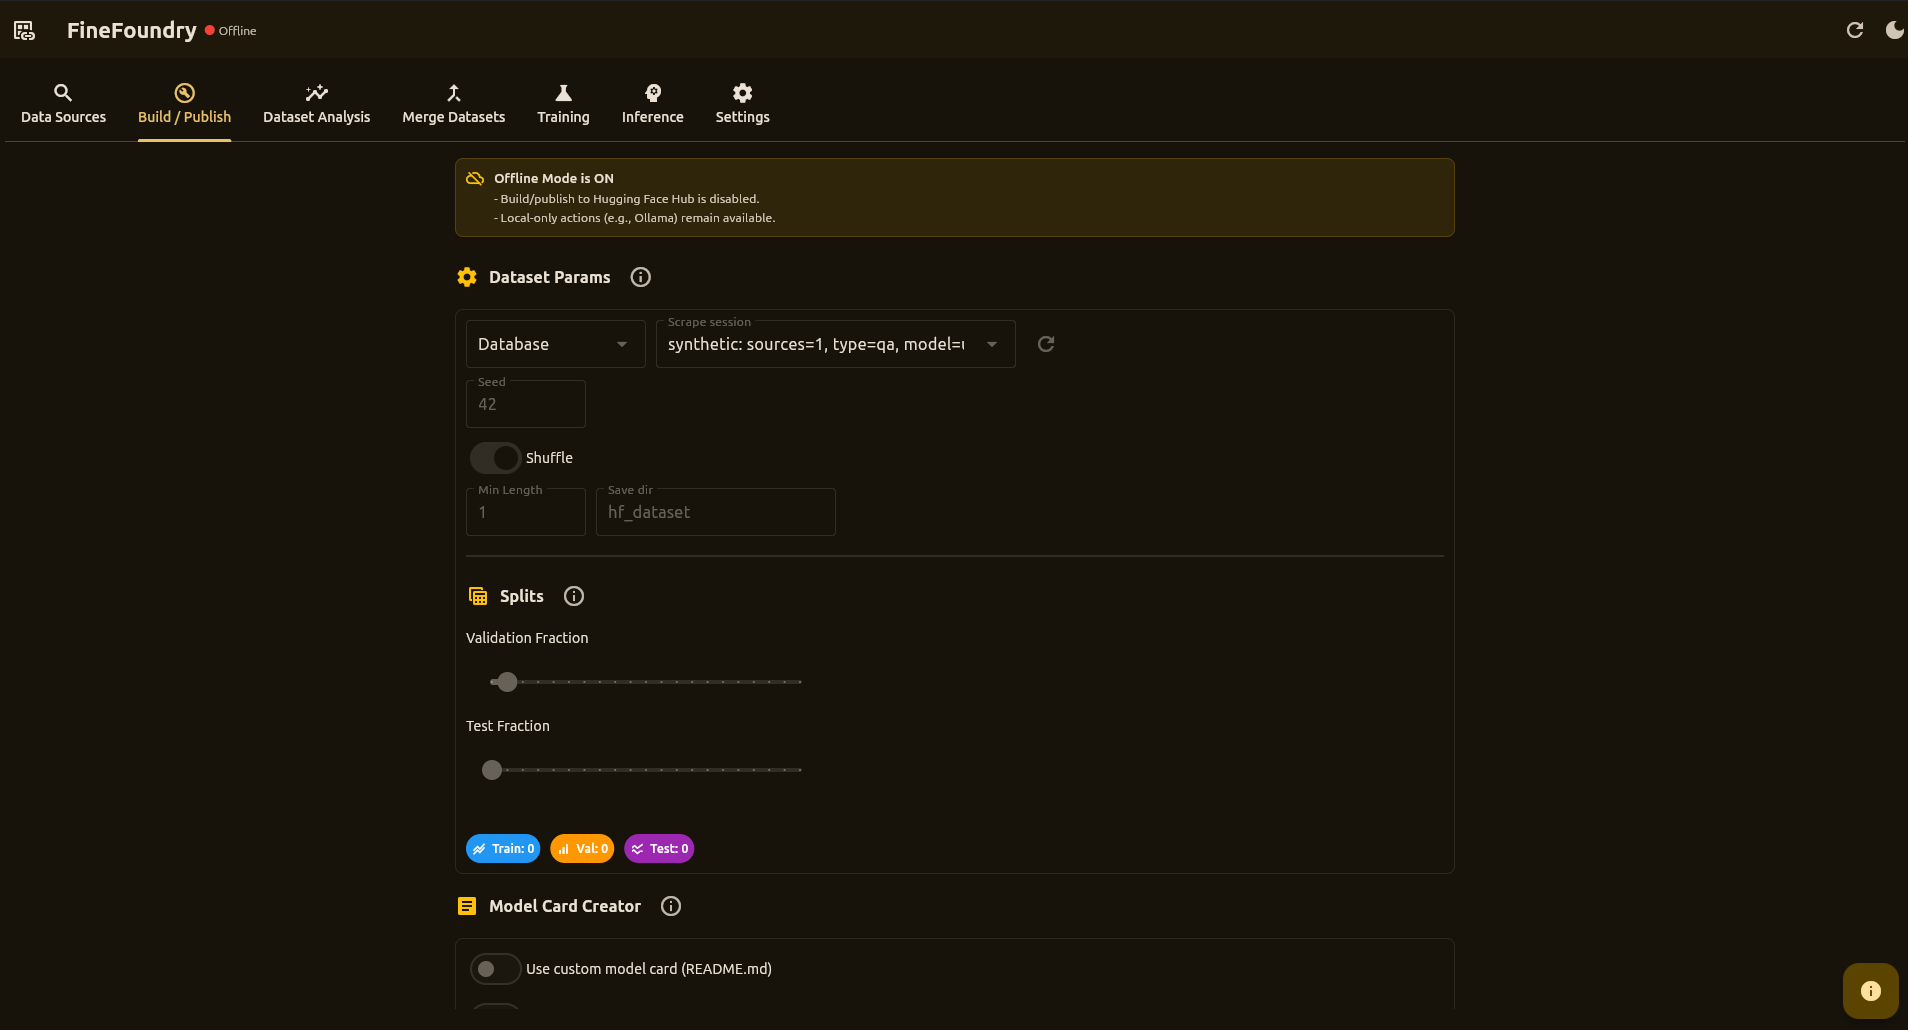
Building Your Dataset
- Select your collected data from the dropdown
- Set the split (how much for training vs. validation)
- Click Build Dataset
That's it! Your data is now ready for training.
Sharing (Optional)
Want others to use your dataset or trained model? You can upload to Hugging Face:
- Enable Push to Hub
- Enter your repo name (like
username/my-dataset) - Click Push + Upload README
FineFoundry automatically creates a nice description page for your work!
Training Tab
This is where you teach AI models using your collected data. Pick a dataset, choose your settings, and train—either on cloud GPUs via RunPod or directly on your own computer.
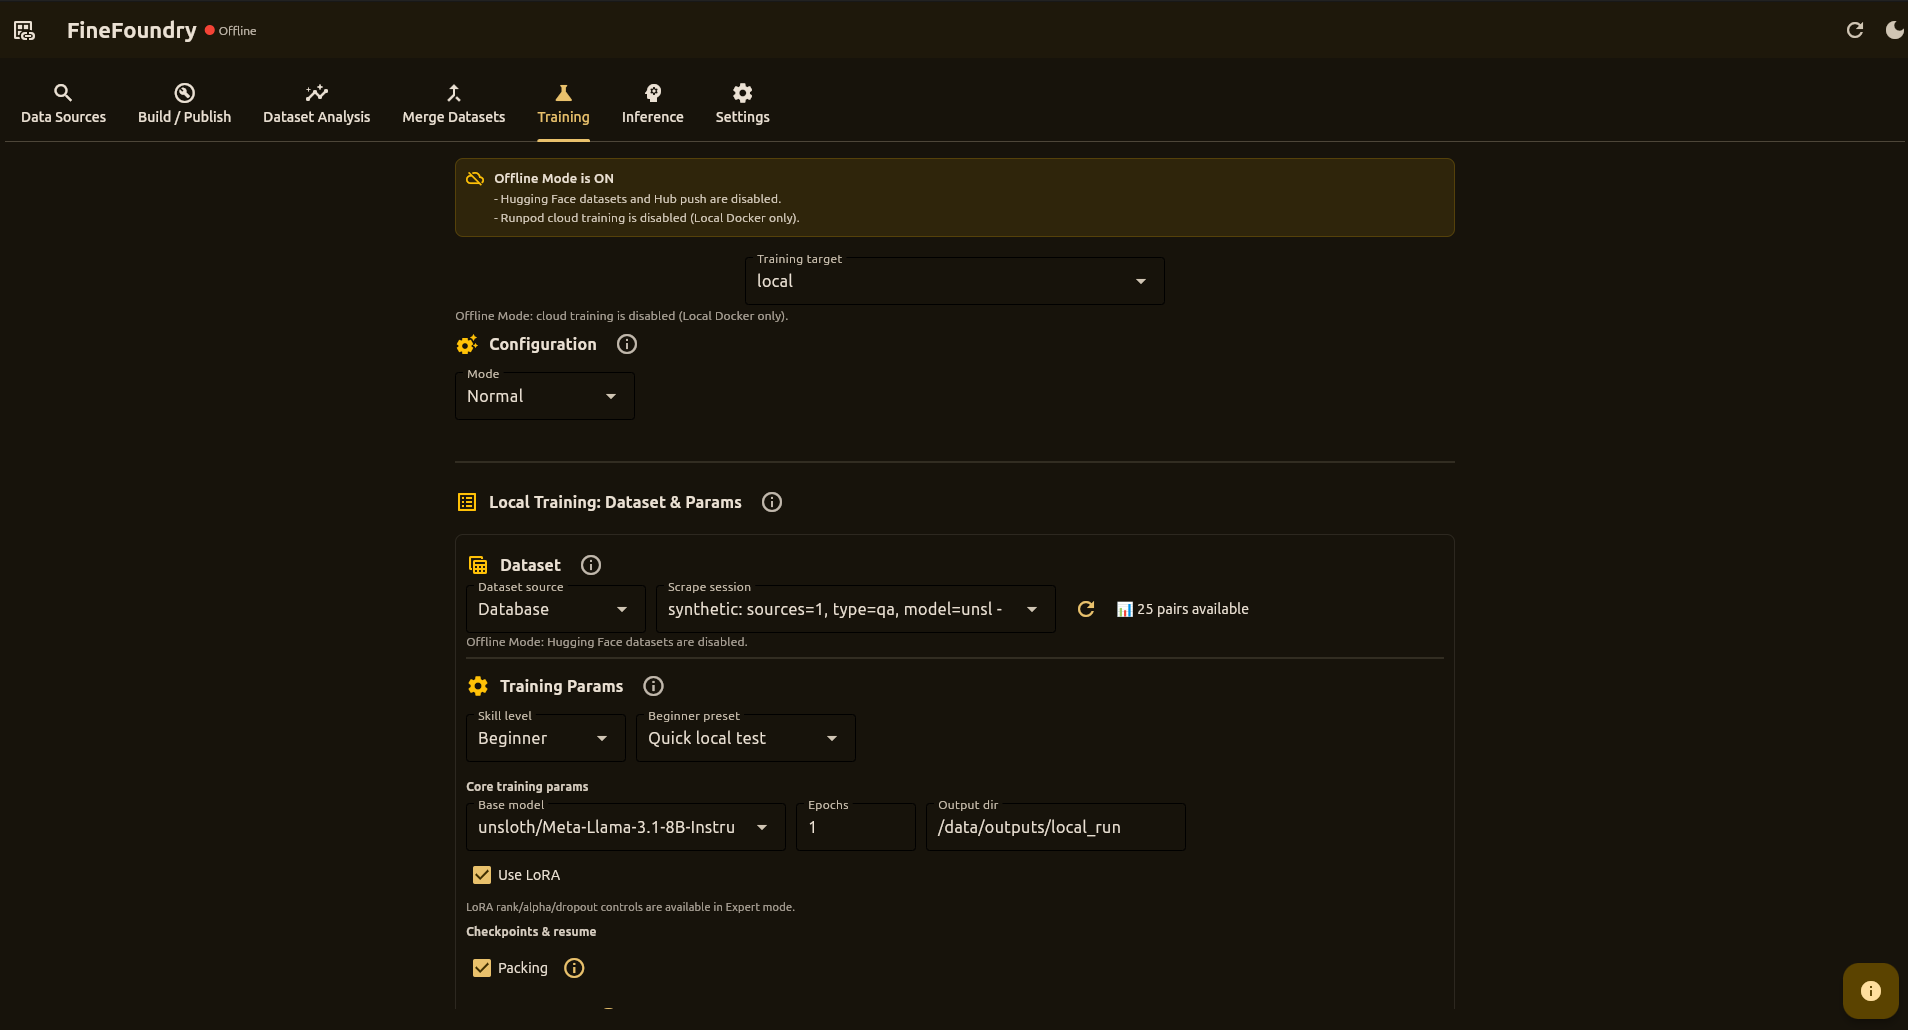
Where to Train
Train on your own GPU—free, private, no internet needed
Rent powerful GPUs for faster training—pay only for what you use
How Training Works
FineFoundry uses modern AI training techniques (LoRA fine-tuning) that let you customize large language models without needing expensive hardware. Local training runs natively on your machine, while RunPod training uses cloud containers for maximum power.
Skill Levels
Beginner Mode
Simplifies choices with safe presets:
- Fastest (RunPod) – Higher throughput on stronger GPUs
- Cheapest (RunPod) – Conservative params for smaller GPUs
- Quick local test – Short run for sanity checks
- Auto Set (local) – Detects GPU VRAM and aggressively pushes throughput while still aiming to avoid OOM
- Simple custom – Guided controls for duration, memory/stability, and speed vs quality

Expert Mode
Full control over all hyperparameters for experienced users.
Hyperparameters
- Base model – Default:
unsloth/Meta-Llama-3.1-8B-Instruct-bnb-4bit - Epochs – Number of training epochs
- Learning rate – Step size for optimization
- Batch size – Samples per device per step
- Gradient accumulation – Steps before weight update
- Max steps – Upper bound on training steps
- Packing – Pack multiple short examples for throughput
- Auto-resume – Continue from latest checkpoint
Quick Local Inference
After a successful local run, the Quick Local Inference panel appears:
- Sample prompts – 5 random prompts from your training dataset are auto-loaded for quick testing
- Enter a prompt manually or select a sample from the dropdown
- Choose presets: Deterministic, Balanced, or Creative
- Adjust temperature and max tokens with sliders
- View prompt/response history
- Export chats – Save your prompt/response history to a text file
The sample prompts feature lets you quickly verify your model learned from the training data without manually copying prompts.
Saving Configurations
Training configs are stored in the SQLite database:
- Click Save current setup to snapshot your configuration
- Use the dropdown to load saved configs
- The last used config auto-loads on startup
- All configs persist across sessions in
finefoundry.db
Inference Tab
This is where you chat with your trained AI model! Think of it as a testing playground where you can ask questions and see how your model responds.
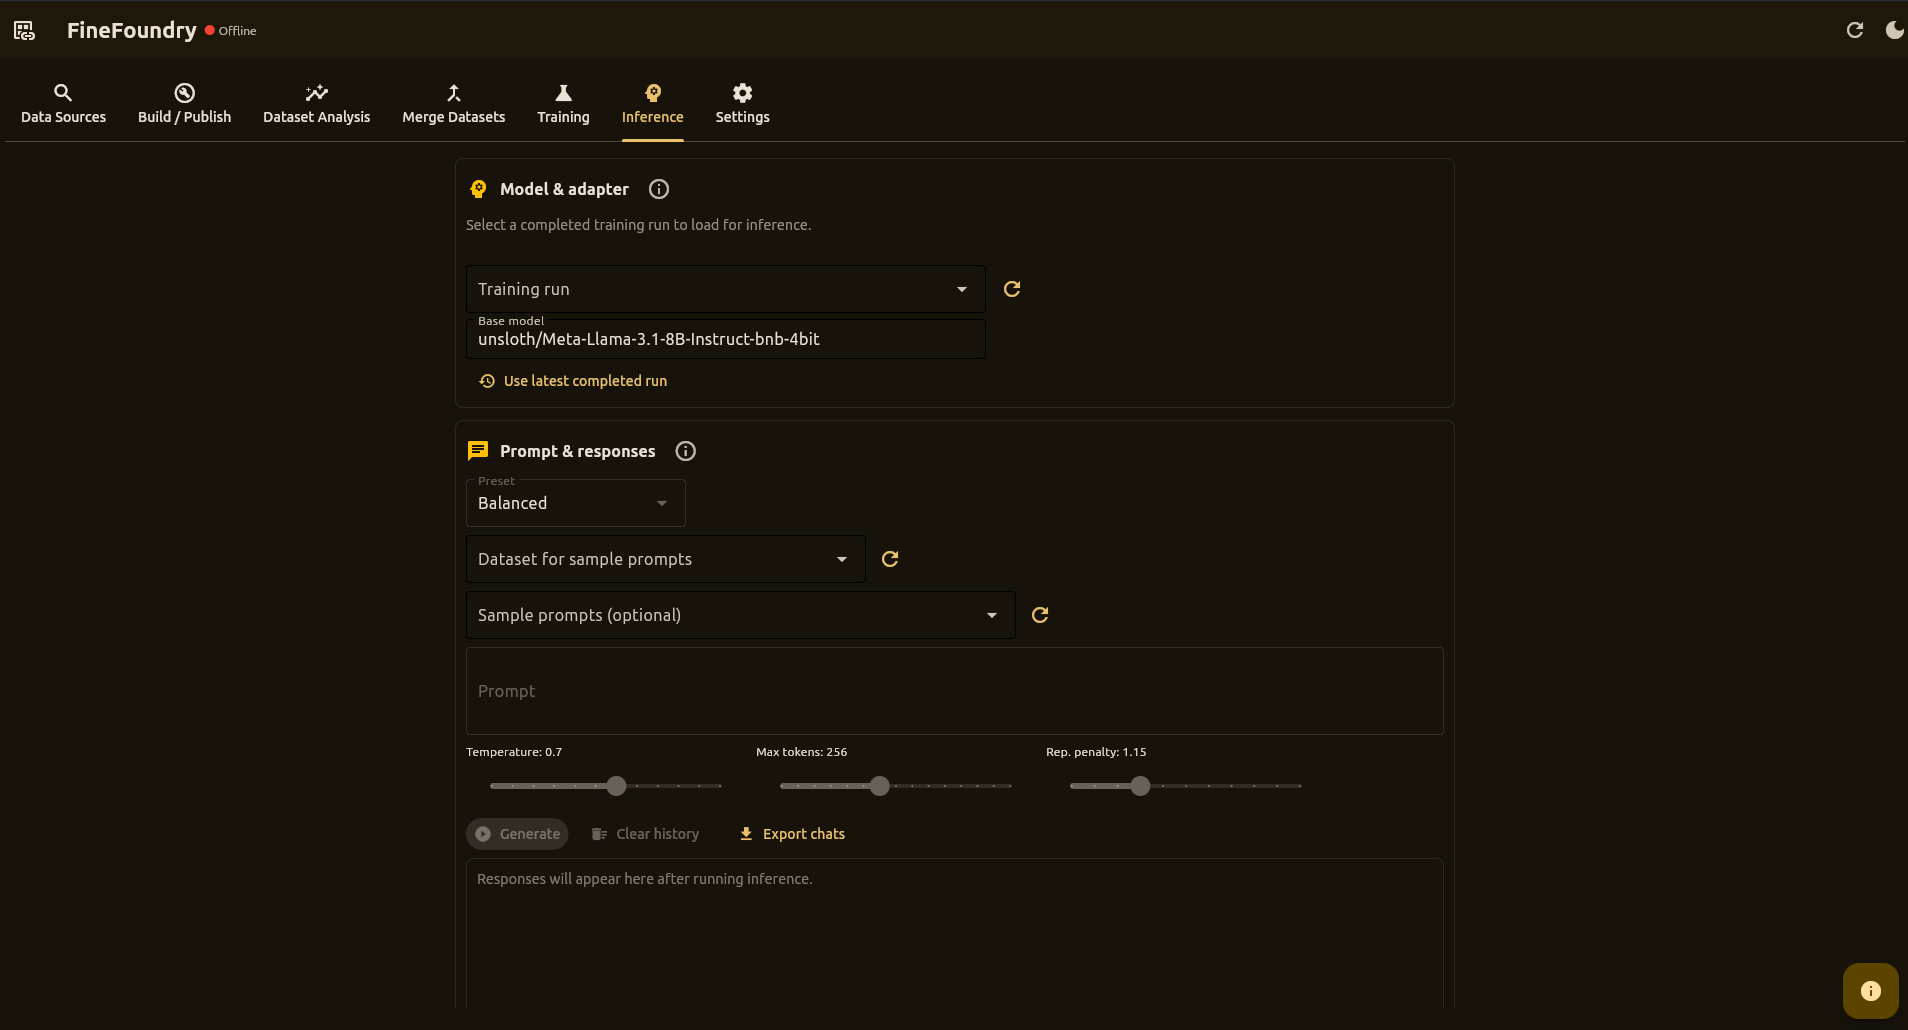
How to Test Your Model
- Select a completed training run from the dropdown
- Wait for the green "ready" status
- Type a message and click Generate
- See how your AI responds!
Try different questions to see how well your model learned. For extended conversations, click Full Chat View to open a dedicated chat window.
Sample Prompts
The Inference tab lets you select any saved dataset to sample prompts from:
- Select a dataset from the Dataset for sample prompts dropdown
- 5 random prompts are loaded into the Sample prompts dropdown
- Click the refresh button to get new random samples
- Select a sample to automatically fill the prompt text area
Unlike Quick Local Inference (which only uses the training dataset), the Inference tab can test against any dataset in your database.
Adapter Validation
When you select a training run, FineFoundry:
- Shows a loading spinner while checking the folder
- Verifies the directory contains LoRA artifacts (
adapter_config.json, weight files) - If valid: unlocks the Prompt & Responses section
- If invalid: shows an error and locks the controls
Generation Controls
- Preset dropdown – Quick settings for different use cases
- Temperature slider – Controls randomness (0.0 = deterministic)
- Max new tokens slider – Upper bound on generated tokens
Full Chat View
Click Full Chat View to open a focused chat dialog:
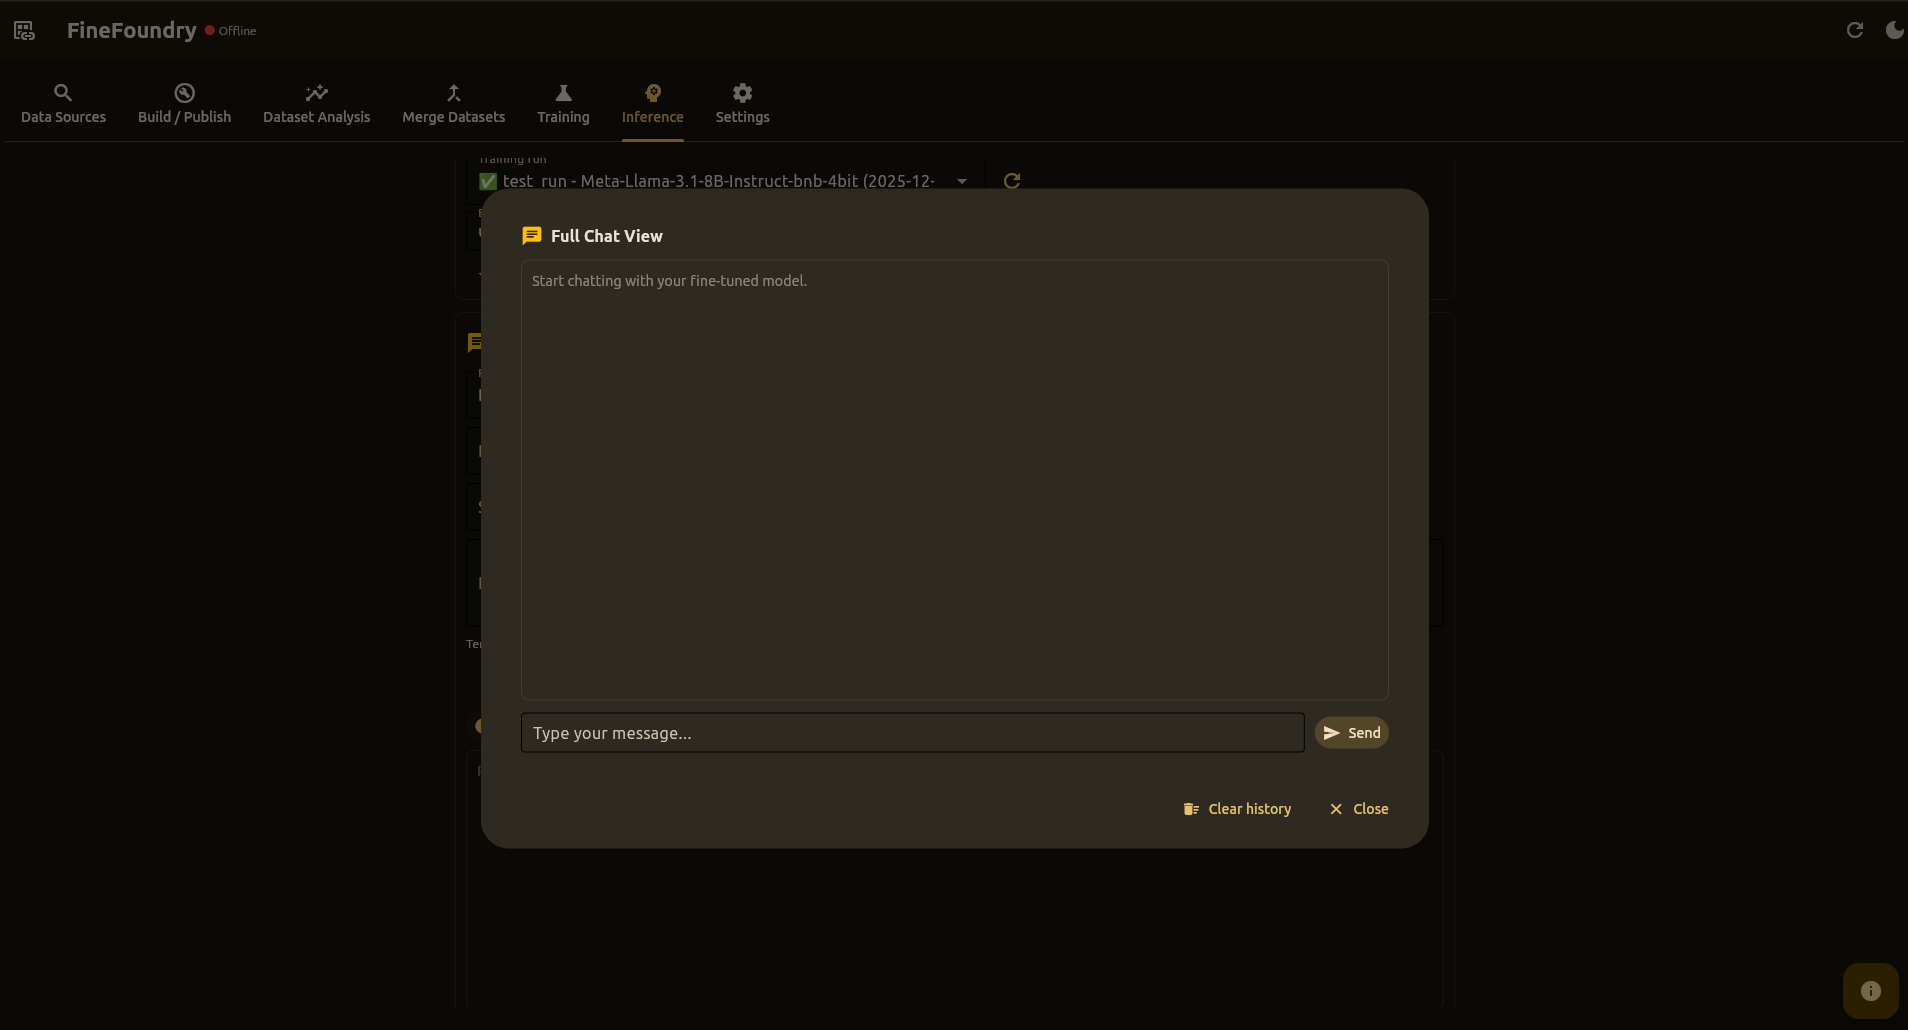
- Large chat area with user/assistant bubbles
- Multiline message composer
- Shared conversation history with main view
- Proper chat templates for multi-turn conversations
- Clear history and close buttons
Under the Hood
Powered by the same stack as training:
- Transformers –
AutoModelForCausalLM,AutoTokenizer - PEFT –
PeftModelfor adapter loading - bitsandbytes – 4-bit quantization on CUDA
- Chat Templates – Proper formatting for instruct models (Llama-3.1, etc.)
- Repetition Penalty – Prevents degenerate/looping outputs
- 100% local – No external API calls
Merge Datasets Tab
This is where you combine data from different sources into one big dataset. Great for when you've collected from multiple places and want to train on everything together.
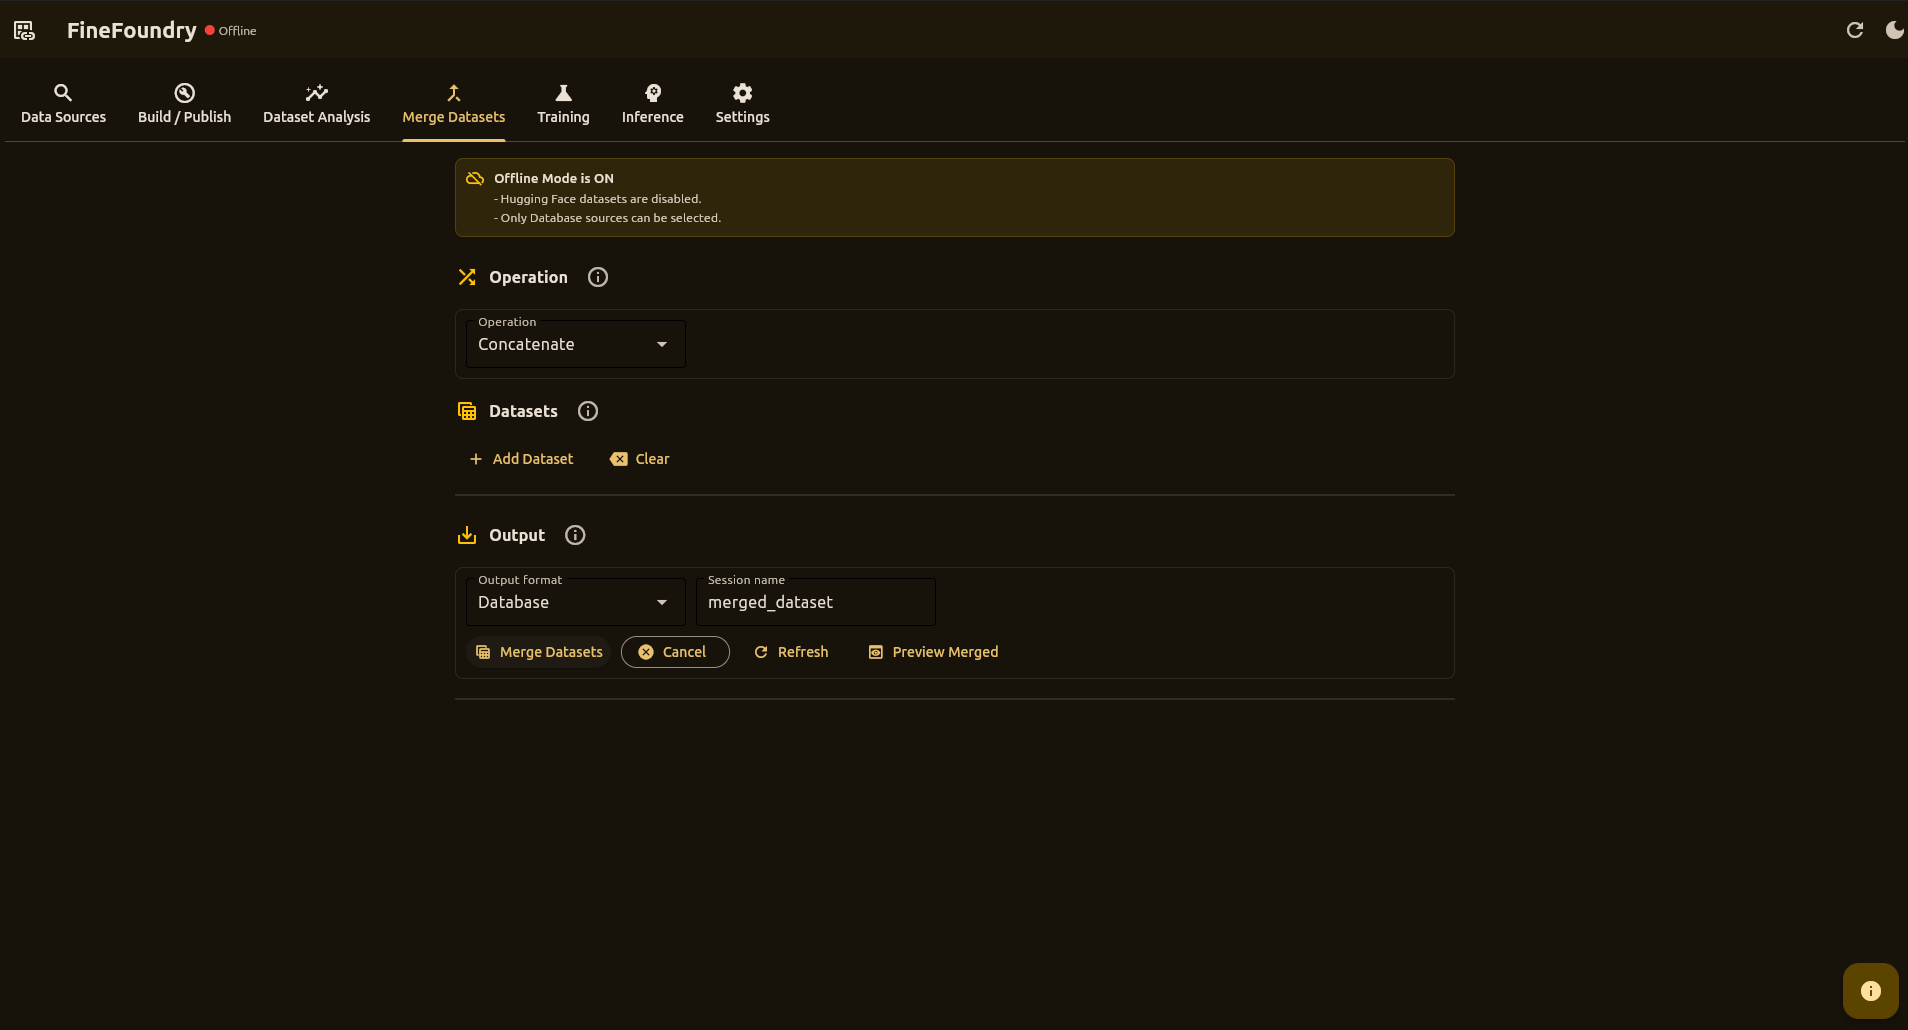
Use Cases
- Combining data from multiple scraping sessions
- Merging database sessions with Hugging Face datasets (when online)
- Creating larger, more diverse training datasets
Operations
- Concatenate – Stack all datasets sequentially
- Interleave – Alternate records for better distribution
Supported Sources
- Database Session – Load from your scrape history
- Hugging Face – Load from Hub with repo, split, and config (when online)
Column Mapping
FineFoundry automatically handles column mapping:
- Auto-detects common patterns:
input/output,prompt/response,question/answer - Normalizes all datasets to
input/outputformat - Filters rows with empty input or output
Output
- Database – Merged data saved to a new database session
- Database + Export JSON – Also export to JSON for external tools
Download Merged Dataset
If you enabled JSON export, click Download Merged Dataset to copy the result to another location.
Dataset Analysis Tab
This is where you check your data quality before training. Think of it as a health checkup for your dataset—it can spot problems before they waste hours of training time.
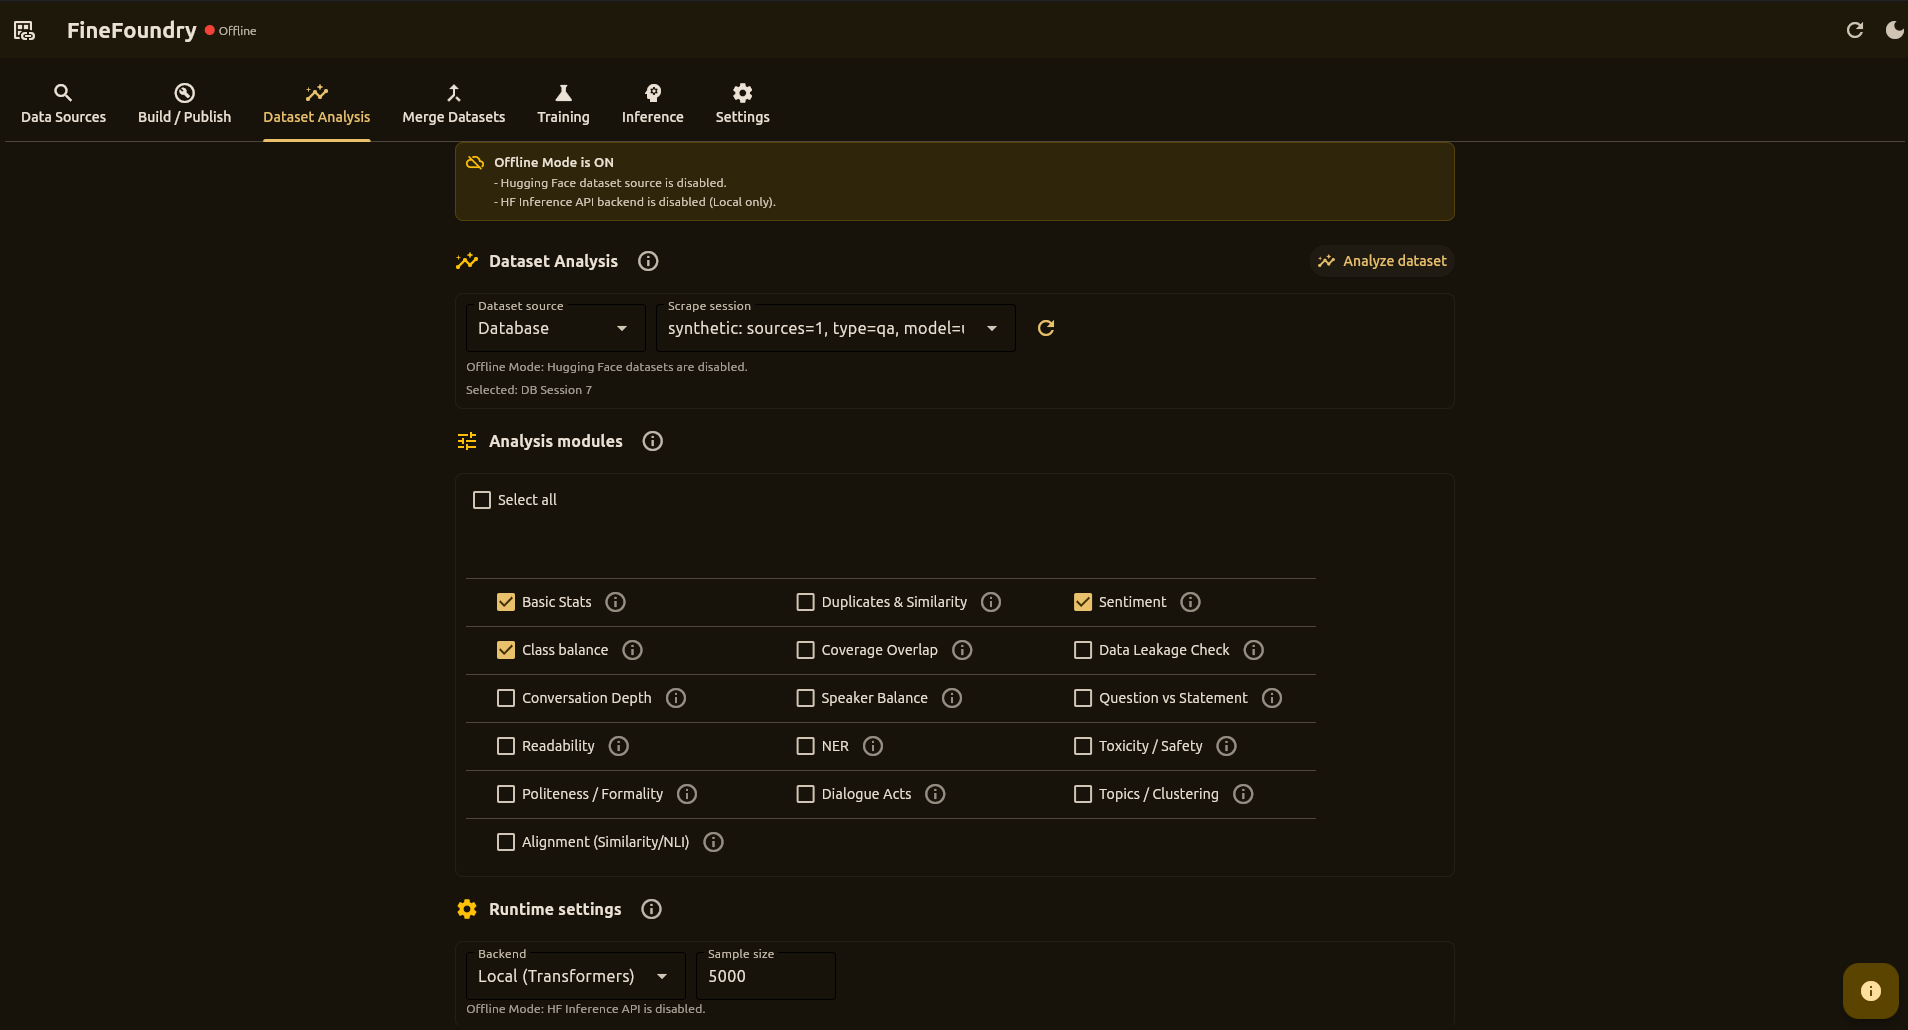
Analysis Modules
- Basic Stats – Record counts, mean lengths
- Duplicates & Similarity – Approximate duplicate rate
- Sentiment – Polarity distribution
- Class Balance – Short/medium/long buckets
- Data Leakage – Train/test overlap detection
- Toxicity – Harmful content detection
- Readability – Text complexity metrics
- Topics – Topic distribution analysis
Workflow
- Select dataset source (Database Session, or Hugging Face when online)
- Enable the analysis modules you need
- Click Analyze Dataset
- Review summary stats and visualizations
Settings Tab
This is where you set up your accounts and preferences. You only need to do this once—your settings are saved automatically.
What You Can Set Up
- Hugging Face — For sharing datasets and models online
- RunPod — For training on cloud GPUs
- Proxy — For routing traffic through Tor or VPN (optional)
- Ollama — For auto-generating descriptions (optional)
Quick Setup
- Get your token/API key from the respective service
- Paste it in the appropriate field
- Click Test to verify it works
- Click Save
System Check
At the bottom, there's a System Check panel that runs tests to make sure everything is working. Use it after installation or if something seems broken.
finefoundry.db and never sent to external servers.
CLI Tools
Everything in the GUI also works from the command line. Use CLI tools when you want to automate workflows, run scheduled jobs, or integrate with CI pipelines.
Building Datasets
The src/save_dataset.py script turns JSON pairs into a proper Hugging Face dataset:
# Configure constants in the file header, then run:
uv run src/save_dataset.py
Configuration options in the file:
DATA_FILE = "scraped_training_data.json"
SAVE_DIR = "hf_dataset"
SEED = 42
SHUFFLE = True
VAL_SIZE = 0.01
TEST_SIZE = 0.0
MIN_LEN = 1
PUSH_TO_HUB = True
REPO_ID = "username/my-dataset"
PRIVATE = True
HF_TOKEN = None  # uses env HF_TOKEN if None
Reddit Scraper CLI
uv run src/scrapers/reddit_scraper.py \
  --url https://www.reddit.com/r/AskReddit/ \
  --max-posts 50 \
  --mode contextual \
  --k 4 \
  --max-input-chars 2000 \
  --pairs-path reddit_pairs.json \
  --cleanup
Important Options
--url– Subreddit or post URL to crawl--max-posts– Maximum posts to process--mode–parent_childorcontextual--k– Context depth for contextual mode--pairs-path– Output path for pairs JSON--cleanup– Delete dump folder after copying pairs
CLI vs GUI
Use the GUI when you want to explore interactively and see visual feedback. Use CLI for automation—cron jobs, CI pipelines, batch processing, or reproducing exact configurations across machines.
Python API
Import FineFoundry's modules directly into your own Python scripts for custom workflows.
4chan Scraper
import sys
sys.path.append("src")

from scrapers.fourchan_scraper import scrape

pairs = scrape(
    board="pol",
    max_threads=150,
    max_pairs=5000,
    mode="contextual",
    strategy="cumulative"
)

# pairs is a list of {"input": ..., "output": ...} dicts
Dataset Builder
import sys
sys.path.append("src")

from db.scraped_data import get_pairs_for_session
from save_dataset import build_dataset_dict, normalize_records

# Load pairs from a database scrape session
pairs = get_pairs_for_session(session_id=1)
examples = normalize_records(pairs, min_len=1)

# Build a DatasetDict with train/validation/test splits
dd = build_dataset_dict(examples, val_size=0.05, test_size=0.0)
Local Inference
import sys
sys.path.append("src")

from helpers.local_inference import generate_text

response = generate_text(
    base_model="unsloth/Meta-Llama-3.1-8B-Instruct-bnb-4bit",
    adapter_path="/path/to/adapter",
    prompt="What is machine learning?",
    temperature=0.7,
    max_new_tokens=256,
)
Local Training
Train AI models directly on your own computer—no cloud services, no extra costs, complete privacy.
What You Need
- NVIDIA GPU with at least 8GB VRAM (12GB+ recommended)
- CUDA drivers installed on your system
- Python packages are installed automatically by FineFoundry
How It Works
When you start local training, FineFoundry runs the Unsloth trainer as a native Python process on your machine. No Docker or containers needed—everything runs directly on your GPU.
Getting Started
- Go to the Training tab
- Select Local as your training target
- Choose a preset (try "Quick local test" first)
- Click Start Training
Tips for Success
- Start small — Use "Quick local test" preset first to verify everything works
- Watch memory — If you get "out of memory" errors, reduce batch size
- Close other apps — Games and browsers use GPU memory too
- Check progress — Training logs show real-time updates
RunPod Setup
Run training jobs on remote GPUs using RunPod.
How It Works
When you select RunPod – Pod as the training target:
- FineFoundry connects using your RunPod API key
- Ensures a Network Volume exists (mounted at
/data) - Ensures a Pod Template exists for your hardware
- Launches pods to run training jobs
- Writes outputs to
/data/outputs/...on the network volume
Prerequisites
- RunPod account with billing/credits
- RunPod API key (configure in Settings tab)
- Available GPU type in your desired region
Step 1: Configure API Key
- Open the Settings tab
- Paste your API key in RunPod Settings
- Click Test to verify, then Save
Step 2: Create Network Volume
In the RunPod console:
- Create a Network Volume (size depends on your needs)
- Note the volume identifier
- In FineFoundry, use Ensure Infrastructure to verify
Step 3: Create Pod Template
Create a template that:
- Uses
docker.io/sbussiso/unsloth-trainer:latest - Mounts the Network Volume at
/data - Has your desired GPU/CPU/RAM resources
Step 4: Launch Training
- Set Training target to RunPod – Pod
- Configure dataset and hyperparameters
- Set Output dir under
/data/outputs/... - Start the training job
Troubleshooting
Something not working? Find your problem below and follow the fix.
App Won't Start
- "Python not found" — Make sure Python 3.10+ is installed
- "Module not found" — Run
pip install -e . --upgrade - Dependencies broken — Delete
.venvfolder and runuv run src/main.pyagain
Training Problems
"Out of memory" or "CUDA OOM"
Your graphics card ran out of space. Try these:
- Use "Quick local test" preset (uses less memory)
- Reduce batch size to 1 or 2
- Close other programs using your GPU
- Try RunPod cloud GPUs instead
Training seems stuck
- Check the logs — it might just be slow
- Large models can take hours
- Look for red error messages
Sharing Problems
- "401" or "403" error — Your token is wrong or expired. Re-enter it in Settings.
- Make sure token has "write" permission — Read-only tokens can't upload
Testing Problems (Inference)
- "Validating" never finishes — Training might not have completed successfully
- First response slow — Normal! The model needs to load first (30-60 seconds)
- Responses don't make sense — Try training for more steps or check data quality
Quick Fixes to Try First
- Restart the app — Fixes many temporary issues
- Check the logs — Look for red error messages
- Try smaller settings — Fewer threads, smaller batch size
Still Stuck?
- Search existing issues: GitHub Issues
- Ask the community: GitHub Discussions
Upgrade Notes
Returning to FineFoundry after using an older version? These are the key behavior changes to know before following older tutorials.
Major changes
- Database-first workflows: Scrape sessions, training configs, training runs, logs, and settings live in
finefoundry.db. - Publish is database-session based: The GUI builds datasets from database scrape sessions (Hub push is optional).
- Inference is training-run based: Select a completed training run; FineFoundry loads and validates its adapter automatically.
- Offline Mode gating: Disables Hugging Face Hub actions, Hugging Face dataset sources, and Runpod training; Data Sources tab network sources are disabled.
- Dependency management: The repo uses
uvandpyproject.toml;requirements.txtis deprecated.
Full details (core docs): Upgrade Notes